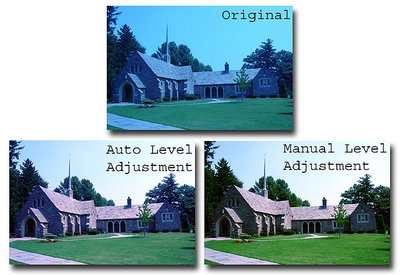
Photographer's Comments This composit shows the same image after 2 different adjustments in Photoshop 7.0. I had a terrible photo of the outside of the church. I figured it could not hurt to try and fix it.
The Original: This is the original image. I had the white balance set for looking at stained glass, which had a lot of blue. I forgot to switch it when I came out to take this picture. Wow! The blue tint is intense.
Auto Level Adjustment Here is what happened when I opened the image in Photoshop 7 and used the "Auto-Level" tool. Looks 90% better than the original. The grass looks green (like blue-grass, actually.) Still needed work, though.
Manual Level Adjustment This is the final product. I took the image back to the original, then adjusted the levels manually (I obviously concentrated on the Blue levels.) This looks more true to life. It is possible, though, that it still needs adjustment, but this is good enough to pass most people's scrutiny. What do you think?
Be kind, and remember, to us digital photographers, Photoshop is our darkroom...