I blurred the background in PSP9. Someone told me I could try DOF in post-editing. I think this looks kind of obvious though...any suggestions? I used the "smudge" button and halved the density on it to 50.
Thanks so much Patrick! I'm going to try all this out today and repost the picture! I really appreciate your help and all the great detailed suggestions!
Andrea, I just found another article that is more the technique I used in my photo "Mighty Rawr" Sorry about the last post, it is a similar technique but this one makes the edges a lot smoother. Here is the article:
Our first task is to duplicate the picture in a new layer. If you're using Jasc Paint Shop Pro, choose Layers, Duplicate from the menu. Nothing appears to have changed, but you really have two identical copies of the photo stacked. Anything we do to the picture now will affect the top layer only, leaving the bottom image intact. We'll take advantage of that next when we add the blur.
Blurring the Picture
Now it's time to blur the picture. We won't differentiate between the subject and the background; we'll blur everything at once. In Paint Shop Pro, choose Adjust, Blur, Gaussian Blur. In the Gaussian Blur dialog box, set the Radius to 15 and click OK.
Here's how this setting works: The greater the radius, the blurrier the image will become. The exact value to use is a matter of personal taste. A radius of 15 will render most backgrounds totally abstract; in the image I'm using, that's the effect I want. If you would rather have less pronounced blur so that you can identify the background, set the radius to a lower value, like 8.
Expose the Subject
Now it's time to reveal the subject of our photos. Click the Eraser Tool, which resides in the seventh cubby from the bottom of the toolbar on the left side of the screen. With the Eraser selected, set the Opacity to about 20 or 30 percent. You can find the Opacity in the Tool Options palette at the top of the screen; if the palette is turned off, toggle it on by choosing View, Palettes, Tool Options. By keeping the opacity low, we can avoid getting a dramatic border between the sharp and blurry parts of the picture. While you're up in the Tool Options palette, set the Size of the eraser to about 50.
Now it's time to erase. Click and drag inside the subject's face, and then move around, revealing sharpness wherever you think it's appropriate. The more times you run the eraser over a given area, the more of the blurry layer you'll erase--so you can control the transition from sharp to blurry everywhere in the frame. To exact finer control over the edges of the subject--like in her hair--you can reduce the radius of the eraser.
Andrea, Very cute photo! I had the same problem that you had with the backgrounds in the photos until I read this article. If you have never used the dupilicate layers technique in PSP9 I suggest you try it, I like it a lot. I have used it to make the background softer and to make everything B&W except for a select part (the eggs and hat and bow would be cute here maybe?) This is the article, the beginning is just telling you to select the part you do not want blurred with the free-hand selection tool. Then he goes on: "When you're done you should see a "halo" of selection dashes around the subject. Now let's duplicate the entire picture and make a second layer. That way, we'll be able to edit one layer without affecting the other. To do that, choose Layers, Duplicate from the menu. If the Layer Palette is open on the right side of your screen, you'll see that we just added a new layer. It's called, rather poetically, Copy of Background. (If you don't see the Layer Palette, choose View, Palettes, Layers from the menu.) You may want to double-click the Copy of Background layer in the palette and rename it to something more logical, like "Subject layer" and click OK to close the dialog box.
Now we're in business. Our next step is to eliminate the background from the top layer, leaving only the subject. Click the Subject layer in the Layer Palette to select it. Then choose Selections, Invert from the menu. Finally, press the Delete key on your keyboard. It's gone! How can you tell? Hover the mouse pointer over the Subject layer in the Layer Palette and you'll see a thumbnail image of the layer.
Blur It Up
Now we're ready for the last step. Click the Background layer in the Layer Palette to switch to the bottom layer--the one that still has a background--and start blurring. Choose Adjust, Blur, Gaussian Blur from the menu and set the radius to 3.0, then click OK. Is it blurry enough for you? If not, apply it again. Notice that the subject stays razor sharp, since it's in the top layer, unaffected by the blur in the bottom." -Dave Johnson, PCWorld Digital Focus
I hope this helps, it really has for me (see my picture -"Rawr"), good luck! Patrick
I'm going to what Tiffany sent me. I totally agree that the smudge is just out of place here. For some reason I couldn't find the "blur" tool, now that I saw it, I think I will redo this photo and resubmit it. Might get to it tomorrow. Thanks for all the comments!
Very cute capture Andrea. I just sent you an email on what I'd recommend for decreasing the dof post-process, it's kind of long but I think it would make a difference. I'd also like to see this without the use of the smudge brush. I kind of looks like the dof might be just right without any addition processing. Nice capture!
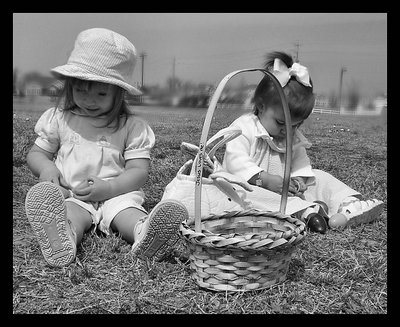
This is a very difficult picture to try and blur the background in post-processing. I say this because of the grass leading from the girls to the houses in the far background. If you had the lense that would do this for you, the grass would have appeared to gradually go out of focus as it got farther away from the girls. Doing this with PSP or Photoshop is very difficult. I have seen very few picture that have achieved the look of what the lense could have gotten. The smudge tool is not the best tool to use, next try, using the "blur" tool it will give you much better results. By the way, beautiful girls. I love the "Jesus loves me" on the handle of the basket. Happy Easter!
Thanks Steven! I went to Wolf last night and checked out the D70 with husband's lens. It worked fine, but they are about $200 more than what I can get it for at buydig.com. As much as I'd like to buy it locally, the money is a factor. I'm going to order it Sun. or Mon. (the website said they will have customer service open tomorrow), I want to ask a couple questions first. Thanks for asking - can't wait till it comes in! Happy Easter!
Nice tones. I love the perspective. I like the expression of wonderment on the girl on the left and the concentration on the right. Nice job. ALso on the previous image I liked the one you did where you left it in b and w but the eggs in color. That might work here too. ANy decision on your Camera?